Showing posts with label DIY. Show all posts

Thursday, October 31, 2013

Happy Halloween from my Minions!

My little minions!


This picture cracks me up. So much personality, these two!


For those who don't know what a minion is, these are minions from a movie that we have watched no less than 20 billion times this year. 

source: focus animation

Today was a fun day. Jackson had a Halloween party at school and I was a 'room-mom'! I was there to help, but I was also eager to meet the girl that Jackson has sworn he is going to marry. It made total sense as soon as I saw her-- she was dressed as a Ninja Turtle!

I had collected the pieces from thrift stores over the past few weeks, but I told Derek the other day that I just wasn't interested in putting in effort to put the costumes together. Jackson went as Batman to school today and Belle just wanted to be a princess. Somehow I got the itch to assemble the costumes this afternoon and so that's what I did all afternoon. The costumes cost me around $10 plus some hot glue. We'll get more use from Belle's yellow hoodie (swimsuit cover) and her overall dress. Jackson's overalls were a tad small and I found his hoodie in the teen girl section. It worked for tonight, but we won't be wearing those again! The goggles are just cardboard from the packaging from Jackson's birthday toys.

We visited the fall festival at our church first and then we visited the nursing home where Derek grandma stays. The residents were lined up in the halls to hand out candy and they were thrilled to have kids visit. We got to peek in and say hi to Great Grandma, too. Jackson really wanted to go trick-or-treating so we visited some houses in a neighborhood close by as well as our neighbors close by! By the end, the kids were tired from walking and were whining that their candy was too heavy.

The kids indulged in candy for a bedtime snack. Halloween is a special time so we want them to enjoy their treats!


Candy is fun and we'll eat it a little bit, but I don't want it to stick around for weeks and weeks. We made a deal with Jackson. He plans to sell us his candy so he can add it to his collection to buy some toys he's been really wanting. 

What's your favorite candy? I've always been a fan of plain chocolate (like Hersey's milk chocolate) but I tried it tonight and it just wasn't as delicious anymore. I did enjoy a pack of Skittles (minus the yellow ones!). But as far as candy goes, dark chocolate is my new favorite!

Photobucket

Sunday, October 28, 2012

Jackson's SUPER 4th birthday!

Jackson turned FOUR today! This birthday came with much anticipation so this was a very exciting weekend-- just as birthdays should be! We celebrated with both friends and family. Most importantly, our boy received lots of special attention and was reminded of how special and loved he is!

Here's a glimpse of Jackson's SUPER 4th Birthday party!

First, here's our birthday boy!


Decorations and treats!


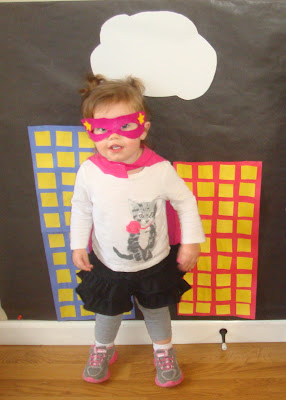
For an activity, we made capes! I had cut them out of old t-shirts! It was super easy to do ahead of time and my mom hemmed up the seams just to make it look nicer. We added a little velcro and it was ready for the kids to personalize. I cut the initials,  super hero shapes, and masks ahead of time. The kids then picked their favorites and made their capes!


And then the kids showed off their capes (and muscles) in front of the backdrop!


And a group photo! Once I snapped this pic, I forgot to take a group photo with their faces! Oops! :)


The kids enjoyed the treats next and then Jackson opened presents! I don't want to bombard this place with photos of all of his presents. Just think lots and lots of super hero items and you'll be pretty close.


Then we headed outside for some Super Hero training exercises. First, we helped our sidekick (a ball) with some flying lessons! And also, they practiced running really, really fast to not get caught underneath the parachute. 


Next, the kids armed themselves with silly string so they could save our city from the villain who made an appearance (okay, maybe I helped a bit too). 


Lastly, the kids worked on their own flying (jumping) skills in the bounce house!


This party was a TON of fun! It was fun to plan and it was fun to see his excitement through it all too. While I'm looking forward to all the fun birthday parties we have ahead, I'm glad we don't have another one coming up soon! Whew! 

I'll be back tomorrow with more stuff about his birthday and our family party!

Photobucket

Monday, December 26, 2011

DIY Handprint Calendar

I have been dying to post about the handprint calendar that the kids and I put together for a few Christmas gifts! Of course, I had to wait until they opened their presents so I wouldn’t ruin the surprise. But I wanted to share it as soon as I could—there is still time for you to make one for the new year!!
I have always liked the idea of personalizing a calendar, but with kids—they grow so fast—that is seems weird to make one. Like, for next December Belle will be almost two {weird thought}, a walking, babbling toddler so pictures from her little baby self will be so… outdated! After seeing different handprint activities on pinterest, it dawned on me to make a calendar and so I scoured the interwebs high and low to find calendar ideas and my favorite handprint/footprint pictures!
Without further ado… I introduce the calendar!


January


February

SAM_7108

March


April

SAM_7110

May

SAM_7111

June


July


August


September


October


November


December

{I don’t have sources for each of this month as I gathered ideas from several places and compiled them into “scenes” I liked most and I even came up with a few by myself.}

How I made my calendar
First, I ordered a calendar {three actually} from Snapfish and I used their seasons template. I’m not a fan of the look of most homemade projects and so I wanted a real looking calendar {not one printed at home and bound together, which would have been fine, just not what I like}. I created an all white image {Microsoft Publisher"} that was the size of a typical 4x6 and I inserted it into each page of the calendar where most people would be including actual pictures of people. This is how I got the border, but also a blank white space.

I made a list of each month and the handprint idea so once my calendars arrived we got started! I used acrylic paint that I picked up from Wal-mart craft section  and then I just started doing one {technically three} at at time. I painted the kids hands/feet instead of having them dip into a plate of paint. This got easier with practice. Well, for Jackson. Belle, not so much.

Planning was the tricky. We couldn’t just take a morning and knock these all out. Because we were working with calendars that were already assembled, we could only do one page at a time—allow it to dry, and then move to the next one. I started at the end of November, so I had plenty of time. From start to finish, it took about two weeks… but could easily be done in a shorter period of time if you were diligent about getting a new page done as soon as the previous one dried.

The biggest challenge was accepting the imperfections that occur when doing art projects with little ones. In my head, I have visions of perfect, un-smudged prints with no accidental paint splotches on the page. Well, that didn’t happen. After having Jackson shut the calendars while February was still drying—leaving pink paint all over the actual calendar grid and the chaotic experience of dealing with a painted, squirmy nine-month old, I had to come to the conclusion that smudges and blotches are okay. The calendars may not be perfect, but they are homemade.

Reflections
I love that we did the hand/footprints on an actual real-looking calendar and that it doesn’t look like something I put together in my basement. I also like the borders each month. I planned my picture so they’d kind of match! However, there was no grace when it came to a mess-up. All attempts were final. I still think I’d take the same route with the premade calendar if I were to do this again.

Glitter—I’m not a fan of how it turned out, which is why it only got used in the February and July. I would buy glittery paint and/or do a handprint in glue and then add the glitter.

Making three at a time was a challenge. Like when I needed four handprints for the clover in March—that was 12 handprints! But honestly I wish I had twice as many to hand out as gifts. I’ve considered maybe doing one and then getting a good photo and then adding the photo to a calendar. This would help with the paint smudges, but I think it’d take away of the cute, homemade project feel.
Overall, this was definitely one of my favorite gifts we gave this year! If you make one {or any handprint activity} be sure to let me know so I can check it out!

Friday, September 30, 2011

DIY t-shirt pillows

This year, all my sister got for her birthday this year was a bunch of old t-shirts! Practically devastating for a girl who starts counting down her birthday from 364 days away.

Never fear, I know better than to let her down on her day! I got so excited about this project months ahead of time and look how cute they look after being re-purposed into pillows!

There's one pillow for each of her schools-- high school, freshman year of college, and the school she just transferred to {which happens to be *my* college and how this whole idea came into play!}. In a major closet cleaning I realized I needed to part with a well loved shirt from my college days, but instead of tossing it, I decided it'd be fun to transform it and give it Laura when she moved down to Springfield. And then I came upon the other shirts and knew I needed to make a trio.

I'm new to crafting and sewing, so I googled ways to make pillows and I decided I wanted to try out a few different methods so each pillow will have a different look. I'll explain a little about how I made them-- I promise it is *so* easy because if I can do it, you can too!

First, the no-sew method. I watched this video for a general idea. Basically, you just need to make two boxes. One that will be the actual pillow perimeter and the next is a larger rectangle {about an inch bigger on each side}. Cut around the the larger rectangle and then cut strips stopping at the inner rectangle. The lady in the video used 2 inch strips, but I used about half-inch strips just because it was a small pillow and I liked the look better.

Lastly, just tie all but a few knots. Stuff and finish tying and  you're ready to go! It took me about an hour or so total. I could have used the same grey shirt for the back, but I thought purple backing would be cute {and it is} and it was around $1 at JoAnn's.  I did use some hot glue some of the seams where stuffing was poking out, but you can't tell. Tip: the longer the strips, the easier it is to tie. You can always go back and trim them down.

This is a t-shirt that was Julie's. Super cute shirt, but it had a hole in the back. It was destined to be a pillow! This was actually a very thin shirt, so before I did anything with it, I sprayed it {inside out} with starch spray a million times, or like six or seven. Made a huge difference. This pillow is just a basic pillow. I cut around the design, had it sewn inside out {I outsourced this job to Mom due to my lack of sewing machine}, turned it right side out, stuff, and then finished sewing it together. I did a pretty miserable job doing the closing stitching... but it's a cute pillow nonetheless!

Lastly, my labor of love pillow. This was a charcoal grey t-shirt, size small {from ya know, back when I actually wore size small t-shirts}. The trouble with small shirts is that the design goes right up to the sleeve, which didn't leave any room for the seam. And the location of the Missouri State and the bear would have made for such an awkward shaped pillow. So with this pillow, I cut out the design and hand-stitched it to a black fabric and then, with inspiration from this blog {a baby bib tutorial, no less!}, I decided to cut little slits along the outline so that it would make frayed edge. I did the lettering first. 

As I started to do the bear, I decided I wanted to add a layer of the maroon behind it to add to the fraying part. I wish I would have done it to the lettering as well, but like I mentioned I hand-stitched and it took forever. I couldn't undo all that work only to do it again!


And then lastly, this pillow was sewn together right side out so that I could make the edges frayed. The key with getting the edges frayed after cutting the slits is to wash it. Also, make sure to purchase flannel material- it frays the best. I picked out a fleece material because it was soft, not thinking how it would fray and it turns out-- it doesn't fray at all. I did add strips of the original shirt to give an extra fluff to the edge.

So anyway, this was a super fun project and the pillows look cool in her apartment. I spent about $5 on fabric, but that's because I chose for the backs to be a different color. I easily could have used the back of the shirt. The black I used for the front of the Missouri State pillow is left over from what I bought for the back of the Mizzou pillow. I cut up one of our old {flat and frumpy} pillows and used it as the filling and it fit the three pillows perfectly.  
Photobucket

LinkWithin

Related Posts with Thumbnails